Automated Lab Report Generation: How to Set It Up
Automated lab report generation connects your LIMS (Laboratory Information Management System) to a report engine through field-mapped templates. The engine renders a finished PDF without manual input, routes it through an approval gate, attaches an eIDAS electronic seal and qualified timestamp, and delivers the sealed document through a client-facing portal. No hand-assembly required at any step.
If your team is still copying values from LIMS exports into Word, reformatting tables, chasing approvals by email, and attaching unsigned PDFs to outbox messages, you are not alone - and that workflow is costing you more than you think. Here is how to replace it with a pipeline that runs itself.
What automated lab report generation actually replaces
The manual assembly problem
The status quo in many European labs looks like this: a technician exports a result set from the LIMS, pastes values into a Word template, reformats the table, routes the document to a reviewer by email, waits for a reply, applies a wet or scanned signature, and sends the finished PDF to the client. Every one of those steps is a failure point. A wrong paste, a missed field, an email that sits unread for two days - these are not edge cases. They are daily friction. If you want to understand the full scale of how to reduce manual data entry in the lab, that problem runs deeper than reporting alone.
Automatic test report generation replaces every manual step with a data-driven pipeline. The LIMS holds the result data. A report engine reads that data and fills a template automatically. An approval gate holds the report for human review - without requiring a human to assemble the report first. After approval, an eIDAS electronic seal and qualified timestamp attach to the PDF. The sealed document lands in a structured delivery portal, not an email attachment.
The components of the pipeline
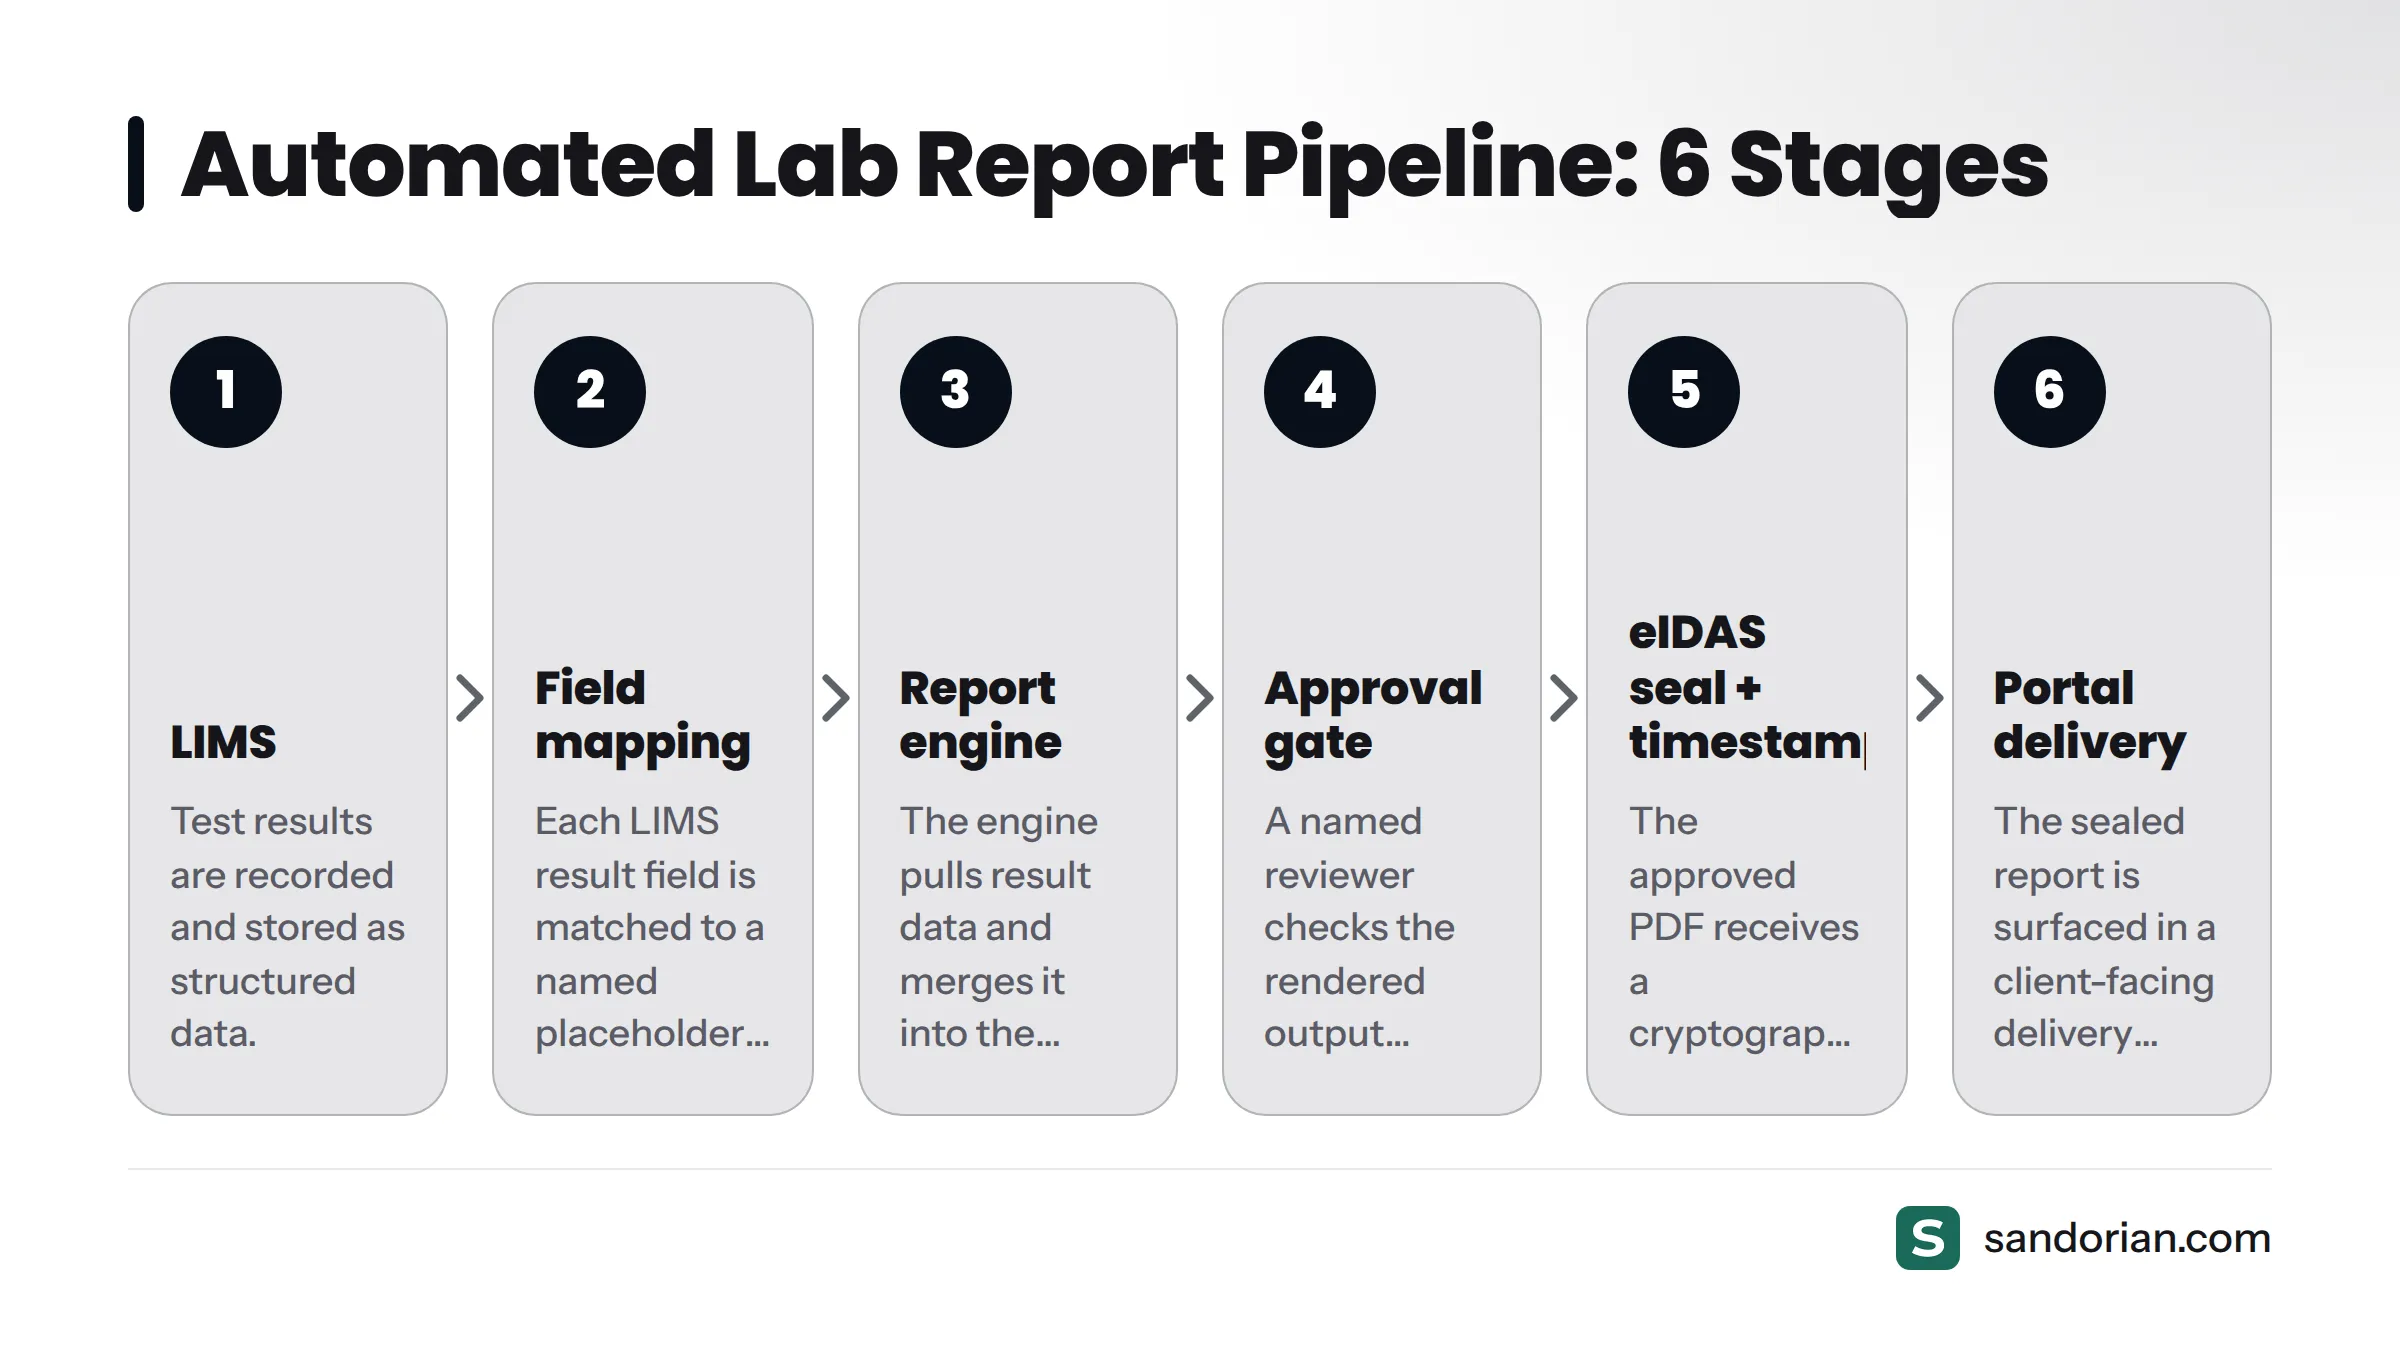
Here is the full pipeline at a glance:
| Stage | What happens |
|---|---|
| 1. LIMS | Test results are recorded and stored as structured data |
| 2. Field mapping | Each LIMS result field is matched to a named placeholder in the template |
| 3. Report engine | The engine pulls result data and merges it into the template |
| 4. Approval gate | A named reviewer checks the rendered output before release |
| 5. eIDAS seal + qualified timestamp | The approved PDF receives a cryptographic seal and time assertion |
| 6. Portal delivery | The sealed report is surfaced in a client-facing delivery portal |
Each stage feeds the next. If any stage is misconfigured, the pipeline stops - which is exactly what you want in a regulated environment. It is worth knowing the workflow gaps a LIMS does not cover on its own before assuming your existing system can carry the full pipeline without additional components.
Step 1 - Map your LIMS result fields to report template placeholders
Field mapping is the foundation of the whole pipeline. A field map is the configuration layer that tells the report engine: "when you read this LIMS field, write its value into this placeholder in the template." A placeholder variable is a named slot in the template document - something like {{analyte_name}} or {{result_value}} - that the engine replaces with live data at render time.
Here is an example field mapping for a veterinary diagnostic report:
| LIMS result field | Placeholder variable | Template position |
|---|---|---|
| Sample ID | {{sample_id}} |
Report header, metadata block |
| Analyte name | {{analyte_name}} |
Result table, column 1 |
| Measured value | {{result_value}} |
Result table, column 2 |
| Unit of measure | {{unit}} |
Result table, column 3 |
| Reference range | {{reference_range}} |
Result table, column 4 |
| Out-of-range flag | {{flag}} |
Result table, column 5 |
| Analyst name | {{analyst_name}} |
Signatory block |
| Test date | {{test_date}} |
Report header |
| Accreditation number | {{accreditation_number}} |
Report footer |
Consistency is what makes rendering deterministic. If the LIMS field is named analyte but the LIMS report template placeholder expects analyte_name, the engine returns a blank - or worse, a rendering error. Lock down your field names before building the template, and treat the mapping configuration as a versioned document.
Data validation note: Run a validation check at this stage to confirm every required LIMS field carries a value before the engine attempts to render. Missing values caught here prevent silent blanks in the finished report.
For broader context on where report automation fits in a larger digitisation programme, see wider lab workflow automation.
Step 2 - Connect your LIMS output to the report engine
A report engine is the component that reads structured result data from your LIMS and merges it into a report template to produce a finished, formatted document. It is not part of most LIMS products out of the box - it is a separate layer that sits between your data store and your template.
The connection between LIMS and engine must carry:
- Result values for every analyte in scope
- Sample metadata: sample ID, collection date, matrix type
- Analyst and reviewer identity fields
- Test date and report date
- Accreditation number and laboratory identifier
- Status flags (e.g. out-of-range, repeat required, confirmed)
The LIMS can expose this data through a file export, a database query, or an API call. The technical mechanics of that connection are covered separately in the guide to pulling results through a LIMS API - this article does not cover integration code. What matters here is that the connection is structured, complete, and triggered automatically when results reach a releasable status in the LIMS.
Step 3 - Build report templates that render results without manual input
A report template is a structured document that combines fixed layout elements - your accreditation logo, section headers, boilerplate text - with placeholder variables that the engine fills at render time. The template encodes the report's structure so completely that the engine needs no human guidance to produce a finished document. This is what it means to generate a PDF report from LIMS data: the template does the structural work once, and the engine does the data work every time.
A production-ready report template must include:
- Accreditation header (laboratory name, accreditation body, accreditation number)
- Sample metadata block (sample ID, client name, collection date, matrix)
- Result table with columns for analyte name, measured value, unit, reference range, and out-of-range flag
- Conditional flagging logic (e.g. highlight rows where
{{flag}}is true) - Analyst name and reviewer name fields (populated from LIMS signatory data)
- Report generation date and report version number
- Page numbering and document control footer
- Laboratory contact details and disclaimer text
ISO 17025:2017 mandates specific content for test reports issued by accredited laboratories. The detailed content rules - which fields are mandatory under the standard - are covered in the knowledge base section on lab standards and certifications, not here. What this step requires is that your template is built to accommodate every mandatory field, so the engine can populate them from LIMS data without leaving gaps.
Step 4 - Configure approval gates before a report is released
An approval gate is a configured hold point in the pipeline where a named reviewer must take an explicit action - approve or reject - before the report proceeds to the next stage.
The gate must sit after the engine renders the report and before the eIDAS seal is applied. This placement is non-negotiable for two reasons. Placing the gate before generation would reintroduce manual assembly - the reviewer would be checking a blank form rather than a rendered output. Placing it after sealing would require re-sealing if the reviewer requests a correction, which breaks the integrity of the signed document.
At the gate, the reviewer:
- Opens the rendered PDF and confirms the result values match what is recorded in the LIMS
- Checks that no placeholder variables remain unfilled
- Confirms conditional logic fired correctly (flagged results are flagged, normal results are not)
- Approves or rejects with a recorded reason
Every approve and reject action is timestamped, logged to the audit trail, and attributed to the named reviewer. This report approval workflow is the anchor of your audit-ready lab software posture - you can reconstruct exactly who reviewed what and when, with no reliance on email threads or paper signatures. This principle maps directly to ALCOA+ data integrity requirements, which require that every action on a record be attributable, legible, contemporaneous, original, and accurate.
Automated pre-render data validation - checking for missing fields before the engine runs - is distinct from the approval gate and runs earlier in the pipeline. The gate is for human judgement on the rendered output, not a substitute for automated checks.
Step 5 - Attach an eIDAS seal and qualified timestamp to the generated PDF
Once the approval gate clears, two things attach to the generated PDF before it leaves the pipeline.
An eIDAS electronic seal is an organisational-level cryptographic credential applied to a document to assert that the document was issued by a specific legal entity and has not been modified since issuance. Under eIDAS Regulation (EU) No 910/2014, a qualified electronic seal carries the same legal standing as an organisational wet stamp in all EU member states. For a deeper grounding in what this credential is, see the eIDAS Electronic Seal: What it is and how it works explainer.
A qualified timestamp is a time-bound assertion issued by a qualified trust service provider (QTSP) that the document existed in its current form at a specific moment. It prevents backdating and establishes an irrefutable chronological record of when the report was finalised. The Qualified Electronic Timestamp: What it is and how it works guide covers this in detail.
Together, the seal and timestamp make the report tamper-evident and legally admissible under eIDAS. The PDF format used for sealed lab reports is PAdES (ETSI EN 319 132) - the standard for PDF Advanced Electronic Signatures and Seals in Europe. The technical mechanics of applying a PAdES seal are covered separately in the guide to signing the generated PDF with PAdES.
Step 6 - Deliver the sealed report through a client-facing portal
Email is not a delivery system - it is an inbox. Reports sent as email attachments can sit unread, land in spam, be forwarded without control, and leave no traceable record of when the client actually received or opened the document.
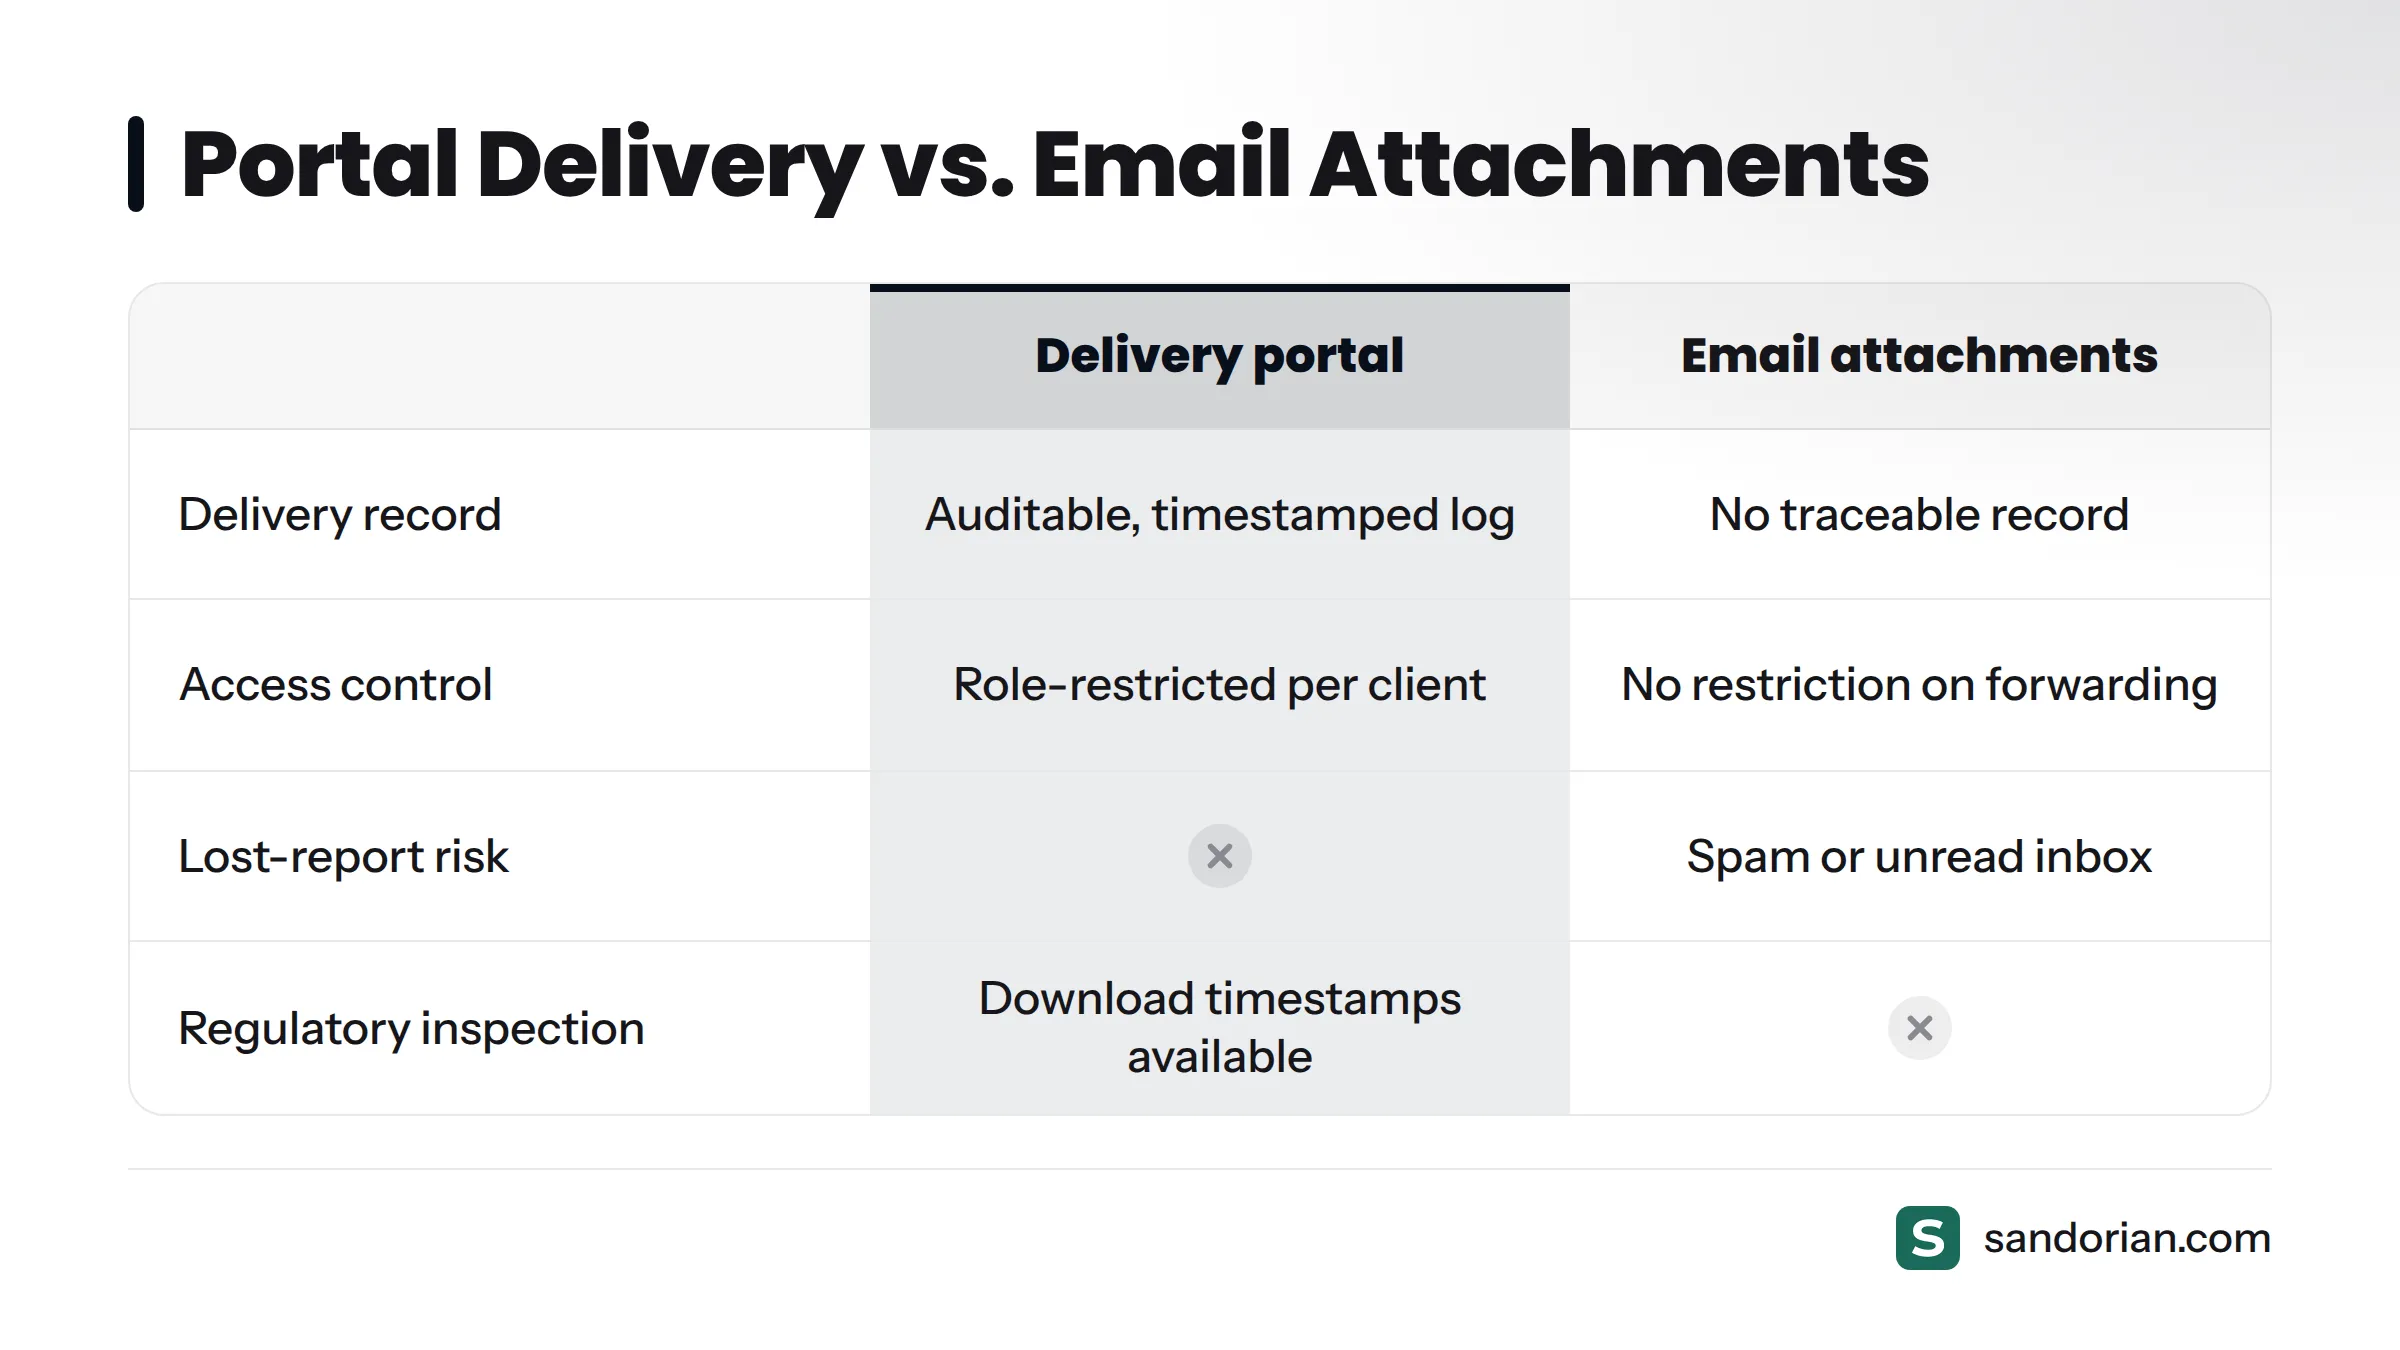
A structured delivery portal replaces all of that. Once the sealed PDF exits the signing stage, it appears in a client-facing portal where the client can authenticate, access their reports, and download the sealed document. Every access event - login, view, download - is logged with a timestamp and attributed to the authenticated user.
For the lab, this means:
- A complete, auditable delivery record for every report
- No report lost in transit or buried in a client's inbox
- Client access is role-restricted: only the authorised contacts see their results
- Download timestamps are available for regulatory inspection
The architecture and configuration of certificate and report delivery portals is covered in detail on that dedicated page.
How ViroVet reduced manual errors by 80% with this pipeline
ViroVet, a European veterinary diagnostic laboratory, came to Sandorian with a reporting process built almost entirely on manual assembly. Lab staff exported result data from their LIMS, populated Word templates by hand, managed approvals through email, and sent unsigned PDFs to clients. The process was slow, inconsistent across report types, and impossible to audit cleanly.
The structural changes Sandorian made followed exactly the pipeline described above: field mapping was configured between all active LIMS result fields and their corresponding template placeholders, a template-based render engine replaced manual copy-paste, an approval gate was placed at the correct position (post-render, pre-seal), and sealed PDFs were routed to a delivery portal rather than sent as email attachments.
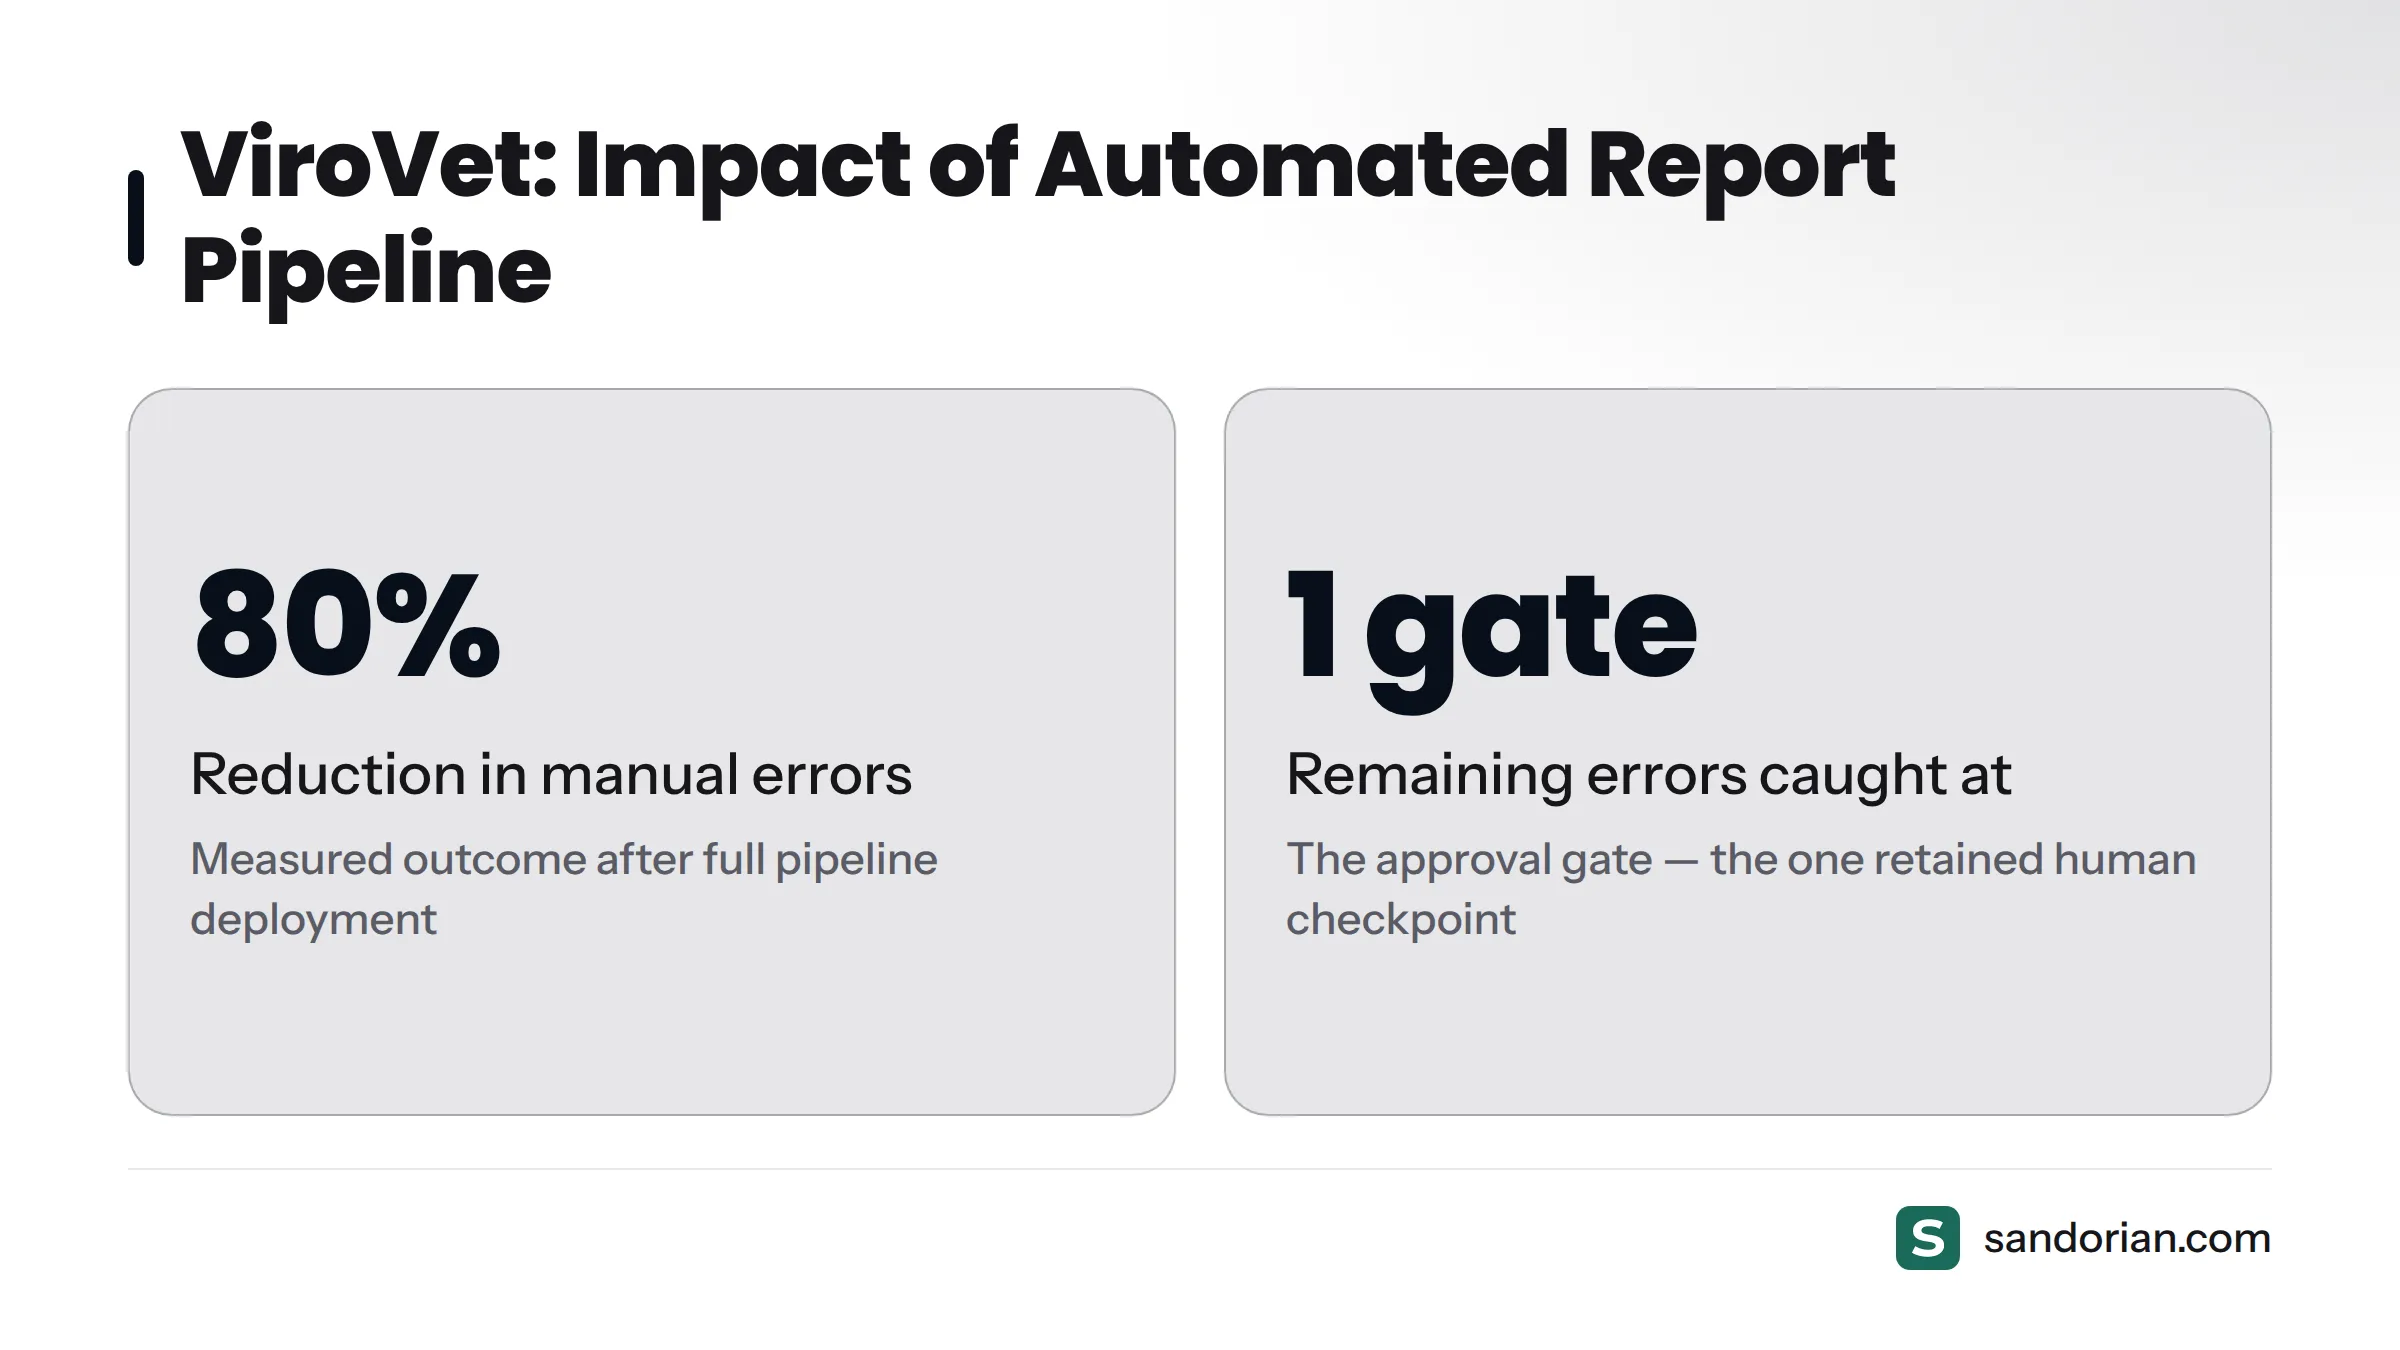
The measured outcome: an 80% reduction in manual errors in the reporting process. The errors that remained were caught at the approval gate - the one human checkpoint that the pipeline is designed to retain. See how ViroVet cut manual errors by 80% for the full case study.
What to check before going live
Before you activate an automated report pipeline in a regulated environment, run through this verification list. Every item here represents a failure mode we have seen in live deployments.
- 1. All LIMS result fields are mapped to template placeholders - no field in scope is unmapped, and no placeholder in the template is unmatched.
- 2. The template renders correctly for every test type in scope - run a render test for each report type, not just your most common one.
- 3. Conditional sections trigger as expected - out-of-range flags appear where they should; normal results do not carry warning markers.
- 4. Data validation rules reject incomplete result sets before rendering - the engine never attempts to render a report with missing required fields.
- 5. The approval gate is configured with named reviewers and escalation rules - every report type has at least one designated reviewer and a defined escalation path if that reviewer is unavailable.
- 6. Audit trail logging is active and capturing every pipeline event - generation, approval, rejection, sealing, and delivery must all appear in the log.
- 7. eIDAS seal credentials are valid and the QTSP connection is live - test a seal operation before go-live; expired credentials cause silent failures at the worst possible moment.
- 8. The qualified timestamp service is responding - confirm the QTSP timestamp endpoint is reachable and returning valid tokens.
- 9. Portal access is configured for the correct client accounts - each client can see their own reports and cannot see anyone else's.
- 10. A parallel run is complete - automated output has been checked side-by-side against previously hand-assembled reports for the same sample set, and discrepancies are resolved.
Frequently asked questions
What is the difference between a report engine and a LIMS?
A LIMS records, tracks, and stores laboratory data - samples, test requests, results, and instrument outputs. A report engine is a separate component that reads that stored data and renders it into a formatted output document. The LIMS is your data store; the report engine is your document factory. Most LIMS products do not include a production-grade report engine capable of handling approval gates, eIDAS sealing, and portal delivery.
Can any LIMS support automated report generation, or does it require a specific setup?
Most LIMS products can expose result data in some form - via export file, database query, or API. What they generally cannot do without additional configuration is connect that data to a template engine, enforce approval gates, or attach regulatory-grade electronic seals. The lab report automation software described here sits on top of the LIMS rather than inside it, which means it can be built alongside most existing LIMS installations without replacing them.
Where exactly does the approval gate sit in the pipeline?
The approval gate sits after the report engine renders the finished document and before the eIDAS seal is attached. This is the only placement that lets a reviewer check a real, complete output - not a blank form - while still allowing corrections before the report is cryptographically locked.
Is an eIDAS seal required for all lab reports, or only specific types?
The eIDAS requirement depends on your regulatory context. For European accredited laboratories operating under ISO 17025 or IVDR, an eIDAS electronic seal provides the legally recognised mechanism for asserting document authenticity and integrity under EU law. It is not universally mandatory for every report type, but for any report used as a legal or regulatory deliverable in the EU, a qualified seal is the appropriate instrument. Check with your accreditation body for the specific requirements that apply to your scope.
How long does it take to set up an automated report pipeline?
Setup time depends on the number of report types, the state of your LIMS data model, and whether your field names are already consistent. For a lab with two to four report types and a reasonably clean LIMS configuration, initial pipeline setup - field mapping, template build, approval gate configuration, and integration testing - typically takes a matter of weeks, not months. The parallel run period (item 10 in the pre-go-live checklist) is usually the longest phase.
What happens if a LIMS result field is missing when the engine tries to render the report?
If data validation is configured correctly (step 1 of the pre-go-live checklist), the engine never reaches a render attempt with a missing required field. The validation layer catches the gap and returns an error that holds the report in a pending state until the missing value is supplied or the issue is escalated. Without data validation, the engine renders the report with a blank field - which is precisely the kind of error that reaches a client undetected in a manual workflow.
Ready to map your report workflow?
Book a workflow review with the Sandorian team. We will map your current reporting process against this pipeline and show you exactly which steps can be automated - and which ones are already costing you time and audit exposure.
Sources
Let's talk
We build the systems that power your business. Let us know how we can help.
Book a 30-min Call